Are
you wondering about which mushrooms to produce from different agrowastes? Then
the answer for you is an oyster mushroom. You can get involved in the
production of these fungal organisms, which are a source of high protein. There
are numerous varieties of mushrooms, and one of the easiest ones to grow is the
oyster ones. Not only they are delightfully flavorful, but they have a positive
impact on health.
Steps
for cultivation
You
can get your hands on the good stuff by trying out oyster mushroom cultivation
on your own. Buy Fresh Oyster mushroom Log to begin
cultivation at home.
1.
Selection
of substrate
Mix the oyster
mushroom spawns with sawdust or straw. You can use other materials too, such as
coffee grounds or cardboard. Even you can utilize agricultural byproducts such
as cotton waste or bagasse from sugarcane. Buy Fresh
Oyster mushroom Log from
Agrinoon(Fujian)
and get ready to enjoy homegrown mushrooms.
2.
Growing
medium
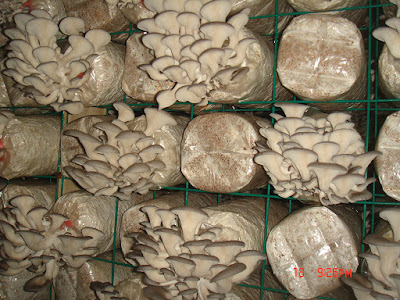
Bags with small
holes are used for storing the growing medium. This step facilitates the air
exchange to take place.
3.
Incubation
process
Warm dark rooms are
used for the incubation process. The bags are placed in these settings so that
the first phase of the growth process can be started. The entire process for
the development of root-like threads called mycelium will take about two weeks
or so.
4.
Fruiting
conditions
As soon as the growing medium is colonized with spawn, then the mushrooms will start fruiting.
If you want to trigger fruiting, then you should reduce the humidity as well as
carbon dioxide to a limited extent. The more the fresh air is introduced inside
the fruiting chamber, the easier it becomes to maintain the humidity level
properly.
5.
Development
of pins
Appropriate fruiting
conditions are an indicator of the mycelium so that they can begin the process
of production. At this juncture, small pins will start to develop. These pins
depend on the mycelium for their nutritional requirements and water supply. It
will take about a week for the development of tiny pins into mushrooms.
6.
Be
ready with the supplies
Before you start the
process, you should have all the supplies in your hand. You can acquire spawn
from some of the leading manufacturers, either online or offline. It is a smart
idea to some research beforehand so that you can get your hands on a reliable
source.
7.
Check
out the expiry date
The date of
inoculation is imprinted on the spawn. You should focus on this date and make
sure that you use up the spawn within that date. Otherwise, mold degradation
may occur, and failures may happen due to the use of contaminated
products.
8.
Get
the right equipment
You should have the
right equipment along with a sterile growing environment. At some point, you
may be tempted to go for cost-cutting techniques. Investing in the right
equipment is worthwhile so that your chances of success are increased
dramatically.
9.
Do
not rush
If you are a first-time grower, then you may be anxious to get the desired outcome fast. The
chances of contamination will rise if you rush into the process.
10. Avoid
thermogenesis
It may so happen
that the temperature of the substrate may shoot up in caparison to the existing
temperature in the room. Under such circumstances, the substrate may end up
cooking the mycelium.
Decide
prudently
You
should research diligently on the net and get in touch with a trustworthy
supplier of a mushroom growing kit.


0 comments:
Post a Comment